Festival Essentials: 7 Unmissable Items
Are you gearing up for an unforgettable festival experience? Having the right festival essentials can truly make or break your time. This guide promises to equip you with the seven most important items, ensuring your comfort and enjoyment. Are you tired of forgetting crucial items and suffering the consequences?
Close your eyes and imagine this: the pulsating music, the vibrant lights, and the electric atmosphere. However, picture yourself unprepared, battling discomfort and missing out on key moments. The right festival essentials transform this scenario into one of pure bliss. You’ll be dancing the night away, fully immersed in the experience, with every need anticipated.
Festivals are more than just parties; they’re opportunities to connect with others and create lasting memories. Packing efficiently and thoughtfully is vital. Therefore, this list focuses on items that enhance your well-being and freedom to explore. You’ll be prepared for anything, from unexpected weather changes to late-night adventures.
Speaking of well-being, let’s explore the health benefits of some items you might bring. For example, consider the humble orange. Oranges are packed with Vitamin C, a powerful antioxidant that boosts your immune system. In addition, they provide a natural energy boost to keep you going all day.
Staying hydrated is also crucial, and that’s where water comes in. Water is essential for maintaining energy levels and preventing dehydration. Proper hydration supports healthy digestion and nutrient absorption. Moreover, it helps regulate body temperature, crucial in crowded and hot environments.
Nuts and seeds are fantastic sources of sustained energy. They are rich in healthy fats, protein, and fiber. Almonds, for instance, provide Vitamin E, which is great for skin health. Furthermore, they offer essential minerals like magnesium, which supports muscle function.
Don’t forget the importance of sun protection. Sunscreen protects your skin from harmful UV rays, preventing sunburn and long-term damage. A surprising fact: even on cloudy days, UV rays can penetrate and harm your skin. Therefore, consistent sunscreen application is a must.
This isn’t just another packing list; it’s a curated guide based on years of festival experience. We’ve learned what works and what doesn’t, ensuring you avoid common pitfalls. This list balances practicality with comfort, so you won’t be weighed down by unnecessary items. As a result, you’ll have everything you need without sacrificing mobility.
This list has been tested and refined by seasoned festival-goers. Families have found it invaluable for keeping everyone comfortable and safe. Beginners appreciate the straightforward approach, eliminating pre-festival stress. [INTERNAL_LINK_1] Moreover, it’s perfect for any festival, whether you’re camping in a field or exploring a city.
This guide covers the festival essentials in a nutshell: quick prep, no cook time, and supplies for one person. It’s beginner-friendly and perfect for weeknights, meal prep (packing!), and impressing your fellow festival attendees.
What are Festival Essentials?
Festival essentials are the items you absolutely need to ensure a comfortable, safe, and enjoyable experience at any festival. These items range from practical necessities like shelter and hydration to comfort items that enhance your overall well-being during the event. Planning ahead with these key items is crucial for a smooth and memorable festival.
Why You Will Love This Guide
- This guide provides a concise list of only the most important items.
- It helps you avoid common pitfalls and discomforts at festivals.
- It balances practicality with comfort for optimal enjoyment.
- It’s perfect for both beginners and experienced festival-goers.
- It ensures you’re prepared for any situation, rain or shine.
Ingredients You Need
- Tent: Your shelter is crucial for rest and protection from the elements.
- Sleeping Bag: Ensures a comfortable night’s sleep, even in cooler temperatures.
- Water Bottle: Staying hydrated is essential for your health and energy levels.
- Sunscreen: Protects your skin from harmful UV rays, preventing sunburn.
- Portable Charger: Keeps your devices powered up for communication and navigation.
- First-Aid Kit: Addresses minor injuries and ensures your well-being.
- Comfortable Shoes: Essential for long days of walking and dancing.
How to Prepare for a Festival Step by Step
- Create a Packing List: Start by listing all the festival essentials you need.
Pro Tip: Categorize your list into sections like shelter, clothing, and personal care.
- Gather Your Supplies: Collect all the items on your list, checking for any damage or wear.
- Test Your Gear: Set up your tent at home to ensure it’s in good working condition.
Pro Tip: Practice packing and unpacking your sleeping bag to optimize space.
- Pack Your Bag: Arrange items strategically, placing heavier items at the bottom.
- Charge Your Devices: Ensure your phone and portable charger are fully charged.
Pro Tip: Download a map of the festival grounds and any relevant apps beforehand.
- Review Your List: Double-check your packing list to ensure you haven’t forgotten anything.
Expert Tips for Best Results
- Pack light to avoid carrying unnecessary weight.
- Choose a tent that is easy to set up and take down.
- Bring a reusable water bottle to stay hydrated and reduce waste.
- Apply sunscreen liberally and reapply throughout the day.
- Store your portable charger in a सुरक्षित place to prevent loss or damage.
- Familiarize yourself with the festival grounds and emergency exits.
- Wear comfortable shoes that can withstand long hours of walking and dancing.
Variations and Substitutions
- Dietary: Pack gluten-free snacks or vegan options to accommodate dietary restrictions.
- Regional: Adapt your clothing to the local climate, bringing warmer layers for colder regions.
- Seasonal: Adjust your packing list based on the season, adding rain gear for wetter months.
- Luxury: Consider adding a portable camping chair or a small fan for added comfort.
How to Pack and Store
For serving, have all your snacks and drinks easily accessible in your backpack. Keep your water bottle filled throughout the day.
For storage, pack your festival essentials in a durable backpack or duffel bag. Store your tent and sleeping bag in waterproof bags to protect them from moisture.
Freezing is not applicable for these items.
Reheating is not applicable for these items.
Frequently Asked Questions
What should I do if it rains at the festival?
Yes, pack a raincoat or poncho to stay dry. Protect your belongings by storing them in waterproof bags. Seek shelter in designated areas if available.
Can I bring my own food and drinks to the festival?
It depends. Check the festival’s rules regarding outside food and drinks. If allowed, pack non-perishable snacks and a reusable water bottle.
How can I stay safe at a festival?
Stay with your friends and look out for each other. Be aware of your surroundings and avoid walking alone at night. Report any suspicious activity to security.
What if I forget something important?
Many festivals have vendors selling essential items. Ask a staff member or check the festival map for locations. Borrow from friends if possible.
How can I protect my phone from getting lost or stolen?
Keep your phone in a secure pocket or bag. Use a phone lanyard to attach it to your clothing. Consider using a portable charger to reduce the need to take it out frequently.
What is the best way to stay hydrated at a festival?
Drink water regularly throughout the day, even if you don’t feel thirsty. Avoid excessive alcohol or sugary drinks, which can dehydrate you. Carry a reusable water bottle.
Having the right festival essentials can transform your experience from stressful to sublime. By prioritizing comfort and preparedness, you can fully immerse yourself in the music, the atmosphere, and the community. Try this guide today and leave a comment below!
Print
Festival Essentials: 7 Unmissable Items
Description
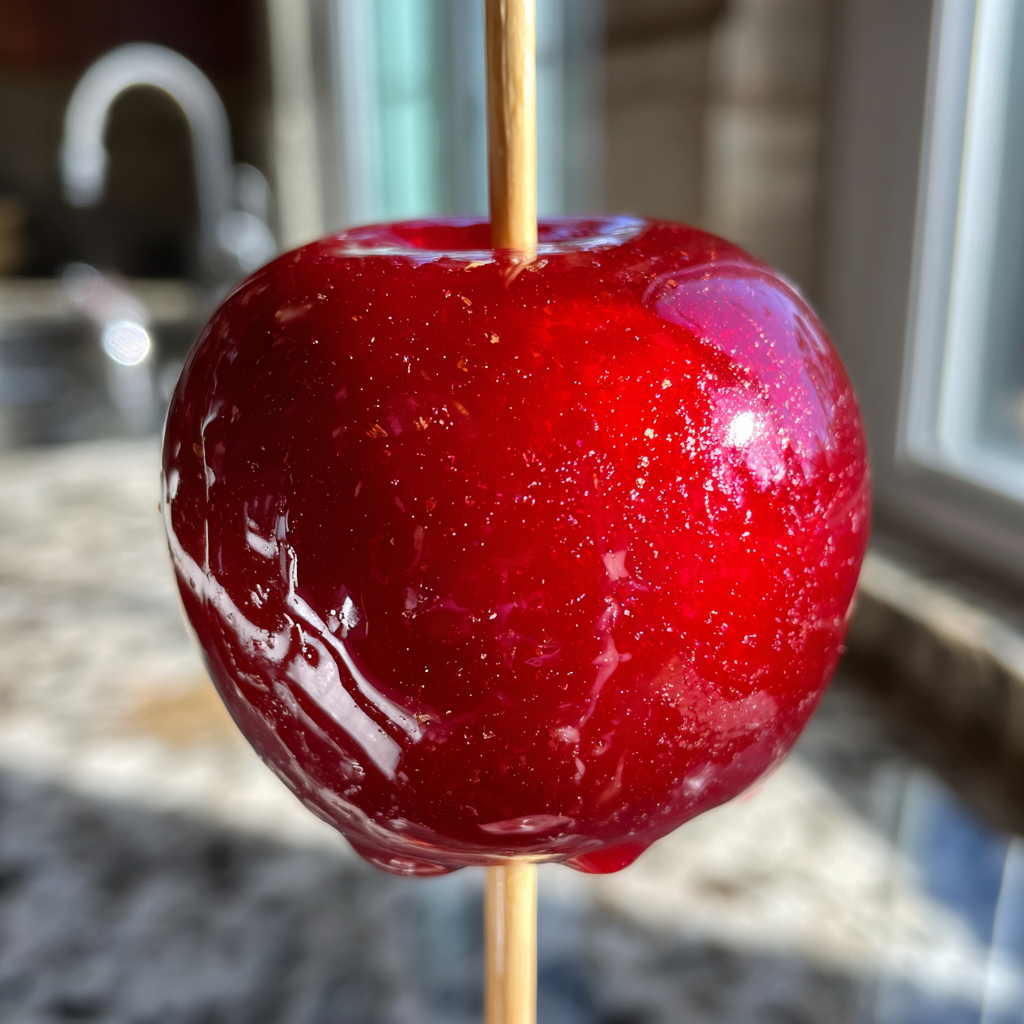
Dieses kandierte Apfelrezept ergibt einen perfekt glänzenden, harten Zuckerguss, der beim ersten Biss sauber zerbricht – jedes Mal. Hergestellt mit nur 5 Zutaten aus dem Vorratsschrank und in 30 Minuten fertig, bringen diese klassischen hausgemachten kandierten Äpfel jede Karnevals- und Halloween-Erinnerung zurück, die Sie haben. Keine klebrige Beschichtung, kein trübes Finish, kein Rätselraten – nur das Echte, direkt in Ihrer Küche hergestellt. Das Geheimnis ist eine Zahl: 149 °C. Wenn Sie diese Temperatur erreichen, können Sie nichts falsch machen.
Ingredients
- 6 mittelgroße Äpfel, feste Sorte – Granny Smith (säuerlich) oder Fuji (süß) dringend empfohlen
- 2 Tassen (400 g) Kristallzucker
- 1/2 Tasse (120 ml) heller Maissirup
- 3/4 Tasse (180 ml) Wasser
- 1/2 Teelöffel rote Gelfarben (Gel ergibt eine tiefere Farbe als Flüssigkeit)
- 1/2 Teelöffel Zimtextrakt oder Aromaöl (optional)
- 6 Holzstiele für kandierte Äpfel oder stabile Lutscherstiele
- Antihaft-Kochspray
- Backpapier oder Silikonbackmatte
Instructions
- Richten Sie Ihren Arbeitsbereich ein, bevor Sie beginnen: Legen Sie ein Backblech mit Backpapier aus und sprühen Sie es leicht mit Antihaft-Kochspray ein. Halten Sie Ihre Äpfel am Stiel bereit und in Reichweite. Sobald der Zucker die Temperatur erreicht hat, müssen Sie sich schnell bewegen – Vorbereitung ist alles.
- Entfernen Sie jegliches Wachs von Ihren Äpfeln. Im Laden gekaufte Äpfel haben eine lebensmittelechte Wachsschicht, die verhindert, dass die Süßigkeit haftet, und Blasen verursacht. Tauchen Sie jeden Apfel 5 Sekunden lang in kochendes Wasser und schrubben Sie ihn dann mit einem rauen Küchentuch trocken. Stecken Sie einen Holzstiel fest in das Stielende jedes Apfels und schieben Sie ihn mindestens bis zur Hälfte durch. Legen Sie sie beiseite auf das vorbereitete Backblech.
- Kombinieren Sie Zucker, Maissirup und Wasser in einem mittelgroßen Topf mit schwerem Boden. Rühren Sie vorsichtig um, bis der Zucker feucht ist. Befestigen Sie ein Zuckerthermometer an der Seite des Topfes und stellen Sie sicher, dass die Spitze in die Mischung eingetaucht ist, aber nicht den Boden des Topfes berührt – eine ungenaue Messung ruiniert die Beschichtung.
- Stellen Sie den Topf bei mittlerer bis hoher Hitze auf den Herd. Bringen Sie die Mischung unter Rühren zum Kochen. Sobald die Mischung kocht, wischen Sie mit einem feuchten Gebäckpinsel alle Zuckerkristalle ab, die an den Seiten des Topfes haften – alle Kristalle, die zurückfallen, können dazu führen, dass die gesamte Charge kristallisiert.
- Kochen Sie weiter, ohne zu rühren, bis das Zuckerthermometer zwischen 149 °C und 154 °C anzeigt – dies ist das Hartbruchstadium. Dies dauert ungefähr 15 bis 20 Minuten. Die Temperatur steigt zuerst langsam an und beschleunigt sich dann am Ende dramatisch. Verlassen Sie den Herd in den letzten 5 Minuten nicht.
- Nehmen Sie den Topf sofort vom Herd, sobald er 149 °C erreicht hat. Rühren Sie die Gelfarben und den Zimtextrakt ein, falls verwendet. Nicht zu stark rühren – ein paar sanfte Umdrehungen genügen. Jetzt warten. Lassen Sie alle Blasen vollständig verschwinden, etwa 1 bis 2 Minuten. Das Eintauchen in einen sprudelnden Sirup hinterlässt eine strukturierte, ungleichmäßige Beschichtung auf Ihren Äpfeln.
- Neigen Sie den Topf zu einer Seite, sodass sich der Sirup tief in einer Ecke sammelt – dies erleichtert die vollständige Abdeckung. Arbeiten Sie jeweils mit einem Apfel und tauchen und drehen Sie jeden Apfel, um ihn vollständig zu bedecken, und lassen Sie den Überschuss 3 bis 4 Sekunden lang zurück in den Topf tropfen. Legen Sie jeden beschichteten Apfel mit der Stielseite nach oben auf das vorbereitete Backblech. Berühren oder bewegen Sie die Äpfel nicht, während sie fest werden. Lassen Sie sie vor dem Servieren mindestens 20 Minuten lang vollständig bei Raumtemperatur abkühlen. Die Beschichtung härtet zu einer glasartigen Oberfläche aus.
Notes
- Warum ist meine kandierte Apfelbeschichtung klebrig oder zäh? Der Sirup hat nicht 149 °C (Hartbruchstadium) erreicht. Selbst ein paar Grad weniger – bei 143 °C oder 146 °C – hinterlassen zu viel Wasser im Zucker, was zu einer weichen, taffyartigen Textur anstelle einer harten Schale führt. Verwenden Sie immer ein kalibriertes Zuckerthermometer und nehmen Sie es nicht frühzeitig vom Herd.
- Warum ist meine kandierte Apfelbeschichtung trüb oder voller Blasen? Sie haben die Äpfel getaucht, bevor sich die Blasen nach dem Hinzufügen der Lebensmittelfarbe vollständig gesetzt hatten. Warten Sie immer 1 bis 2 volle Minuten nach dem Entfernen vom Herd, bis die Oberfläche vollständig still und glänzend ist, bevor Sie sie eintauchen.
- Warum haftet die Beschichtung nicht an meinem Apfel? Die Apfeloberfläche war immer noch wachsig oder leicht feucht. Wachs und Wasser verhindern die Zuckerhaftung. Entfernen Sie Wachs mit einem 5-Sekunden-Tauchbad in kochendem Wasser und trocknen Sie ihn dann vor dem Eintauchen vollständig mit einem rauen Tuch ab.
- Kandierte Äpfel niemals im Kühlschrank aufbewahren. Kalte Luft und Feuchtigkeit führen dazu, dass die harte Zuckerbeschichtung Feuchtigkeit aufnimmt und klebrig wird. Bei Raumtemperatur, unbedeckt oder lose verpackt lagern und innerhalb von 1 bis 2 Tagen verzehren, um die beste Textur zu erzielen.
- Wenn der Sirup beim Eintauchen zu dick wird, stellen Sie den Topf 20 bis 30 Sekunden lang bei schwacher Hitze auf den Herd, um ihn zu lockern. Fügen Sie kein Wasser hinzu.
- So machen Sie kandierte Äpfel ohne Maissirup: Ersetzen Sie ihn durch 1 Teelöffel weißen Essig oder frischen Zitronensaft. Dies verhindert die Zuckerkristallisation auf die gleiche Weise wie Maissirup.
- Für Halloween-Kandierte Äpfel: Tauschen Sie rote Gelfarbe gegen Schwarz, Dunkellila oder Waldgrün aus, um ein gruseliges, dramatisches Finish zu erzielen. Schwarze Lebensmittelfarbe funktioniert am besten mit extra-schwarzem Gel, nicht mit normalem Schwarz.
- Bester Tag, um kandierte Äpfel zu machen: ein kühler, trockener Tag mit geringer Luftfeuchtigkeit. An feuchten Tagen bleibt die Beschichtung auch nach dem vollständigen Abkühlen klebrig. Vermeiden Sie es, diese an regnerischen Tagen oder in einer dampfenden Küche herzustellen.
- Die Apfelsorte ist wichtig: Granny Smith bietet einen säuerlich-süßen Kontrast, der die Zuckerbeschichtung durchbricht. Fuji und Honeycrisp sind süßer und ebenso fest. Vermeiden Sie weiche Sorten wie McIntosh oder Red Delicious – sie werden unter dem heißen Zucker matschig.
Nutrition
- Serving Size: 1 kandierter Apfel
- Calories: 271
- Sugar: 65
- Sodium: 3
- Fat: 1
- Saturated Fat: 0
- Unsaturated Fat: 1
- Trans Fat: 0
- Carbohydrates: 71
- Fiber: 4
- Protein: 1
- Cholesterol: 0
Keywords: kandierte Apfel Rezept, hausgemachte kandierte Äpfel, einfaches kandiertes Apfel Rezept, Halloween kandierte Äpfel, kandierter Apfel ohne Maissirup, Hartbruch kandierte Äpfel, glänzende kandierte Äpfel, kandierte Äpfel von Grund auf, Herbst kandierter Apfel Rezept, Karneval kandierte Äpfel, wie man kandierte Äpfel macht, kandierte Apfel Tipps, klebrige kandierte Apfel Reparatur, beste Äpfel für kandierte Äpfel, Festival Essentials